
Wordfence Login Security の設定方法と使い方です。
特に2段階認証(2FA)する方法を詳細に説明しています。
- Wordfence Login Security とは
- Wordfence Login Security の導入方法
- Wordfence Login Security Installed(インストールされました)
- Two-Factor Authentication(二要素認証)
- Login Security Settings(設定)
- 2FA Roles(2要素認証の役割)
- Allow remembering device for 30 days(デバイスの記憶を 30日間許可する)
- Require 2FA for XML-RPC call authentication(XML-RPC 呼び出し認証に 2FA を要求する)
- Disable XML-RPC authentication(XML-RPC 認証を無効にする)
- Allowlisted IP addresses that bypass 2FA and reCAPTCHA(2FA と reCAPTCHA をバイパスするホワイトリストに登録された IP アドレス)
- Enable reCAPTCHA on the login and user registration pages(ログインページとユーザー登録ページで reCAPTCHA を有効にする)
- reCAPTCHA human/bot threshold score(人間/ボットのしきい値スコア)
- Run reCAPTCHA in test mode(テストモードで reCAPTCHA を実行する)
- How to get IPs(IP を取得する方法)
- NTP
- Enable WooCommerce integration(WooCommerce 統合を有効にする)
- Show last login column on WP Users page(WP ユーザーページに最終ログイン列を表示する)
- Delete Login Security tables and data on deactivation(非アクティブ化時にログイン セキュリティ テーブルとデータを削除する)
- 2段階認証
- まとめ
Wordfence Login Security とは
Wordfence は WordPress を保護するセキュリティソフトです。
Wordfence Login Security は Wordfence に統合されていますが、単独でもインストールすることが可能です。
セキュリティプラグインは別にお気に入りがあるので、2段階認証だけ欲しい場合に Wordfence Login Security は便利です。

メリット
二段階認証や2要素認証は Wordfence でもプレミアム版(有料)の機能として配信されていた機能です。
現在は無料で利用できるのでありがとうと感謝して利用しましょう。
デメリット
Google 製の Invisible reCaptcha for WordPress プラグインとは設定によっては競合する可能性があります。
ログインできない場合は、Invisible reCaptcha Setting の[WordPress]内[Enable Login Form Protection(ログインフォームを有効にする)]のチェックを外して利用してください。
主な機能
- 二要素認証:安全なサービスの標準要件になっている二要素認証を利用できます。
- XML-RPC 保護
- ログイン ページ CAPTCHA
説明書
このページを順番に進めば基本的な設定が完了します。
さらに詳細な情報が必要な場合はわかりやすいマニュアルが用意されているので、そちらで確認してください。

Wordfence Login Security の導入方法
WordPress に Login Security Plugin をインストールします。
Wordfence Login Security は WordPress プラグインディレクトリから自動でインストールできます。
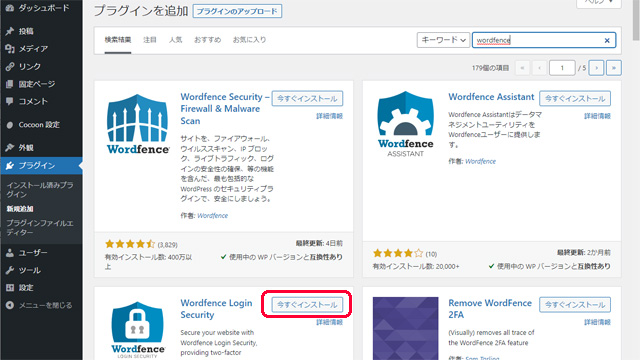

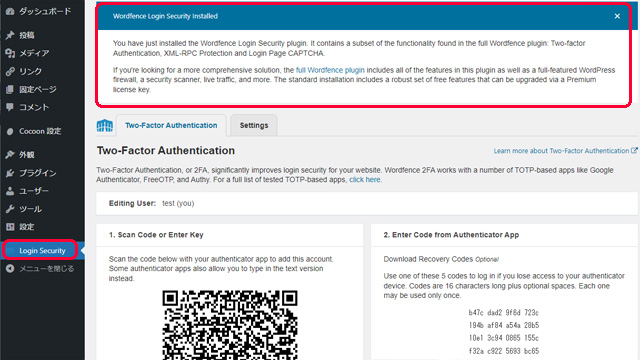
Wordfence Login Security Installed(インストールされました)
インストールして有効化すると WordPress ダッシュボード左メニューに[Login Security]が追加されます。
起動すると最初の画面に通知があります。
English
You have just installed the Wordfence Login Security plugin. It contains a subset of the functionality found in the full Wordfence plugin: Two-factor Authentication, XML-RPC Protection and Login Page CAPTCHA.
If you’re looking for a more comprehensive solution, the full Wordfence plugin includes all of the features in this plugin as well as a full-featured WordPress firewall, a security scanner, live traffic, and more. The standard installation includes a robust set of free features that can be upgraded via a Premium license key.
日本語訳
Wordfence Login Security プラグインがインストールされました。 これには、完全な Wordfence プラグインにある機能のサブセットが含まれています: 2要素認証、XML-RPC 保護、およびログイン ページ CAPTCHA。
より包括的なソリューションを探している場合、完全な Wordfence プラグインには、このプラグインのすべての機能に加えて、完全な機能を備えた WordPress ファイアウォール、セキュリティ スキャナー、ライブ トラフィックなどが含まれています。 標準インストールには、プレミアム ライセンス キーを介してアップグレードできる堅牢な無料機能セットが含まれています。
Two-Factor Authentication(二要素認証)
English
Two-Factor Authentication, or 2FA, significantly improves login security for your website. Wordfence 2FA works with a number of TOTP-based apps like Google Authenticator, FreeOTP, and Authy. For a full list of tested TOTP-based apps, click here.
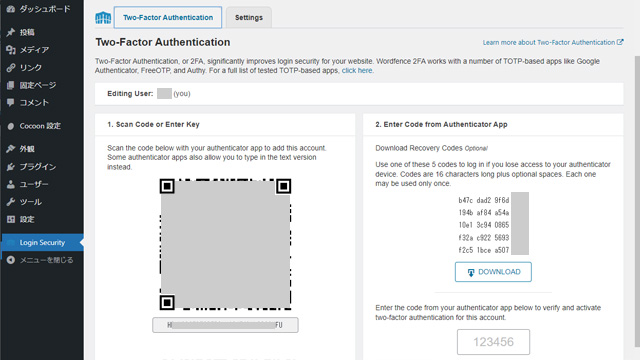
1. Scan Code or Enter Key
Scan the code below with your authenticator app to add this account. Some authenticator apps also allow you to type in the text version instead.
2. Enter Code from Authenticator App
Download Recovery Codes Optional
Use one of these 5 codes to log in if you lose access to your authenticator device. Codes are 16 characters long plus optional spaces. Each one may be used only once.
Enter the code from your authenticator app below to verify and activate two-factor authentication for this account.
日本語訳
2要素認証 (2FA) により、Web サイトのログイン セキュリティが大幅に向上します。 Wordfence 2FA は、Google Authenticator、FreeOTP、Authy などの多くの TOTP ベースのアプリと連携します。 テスト済みの TOTP ベースのアプリの完全なリストについては、ここをクリックしてください。
1. コードをスキャンするか、キーを入力してください
このアカウントを追加するには、認証アプリで以下のコードをスキャンしてください。 一部の認証アプリでは、代わりにテキスト バージョンを入力することもできます。
2. 認証アプリからコードを入力
オプションのリカバリーコードをダウンロード
認証デバイスにアクセスできなくなった場合は、これらの 5 つのコードのいずれかを使用してログインしてください。 コードの長さは 16 文字とオプションのスペースです。 1枚につき1回のみ使用可能です。
以下の認証アプリからのコードを入力して、このアカウントの 2 要素認証を確認して有効にします。
リカバリーコードの使い方
16 個の文字と数字の各行が 1 つの回復コードであり、読みやすいようにオプションのスペースが含まれています。
回復コードを使用するには、ユーザー名とパスワードを入力した後、2FA プロンプトで「1234 5678 90AB CDEF」のようなコードを入力します。
サイトにカスタム ログイン プロンプトがあり、2FA プロンプトが表示されない場合は、「mypassword1234 5678 90AB CDEF」のように、パスワードとコードを一緒に [パスワード] フィールドに入力することで、1 ステップの方法を使用できます。
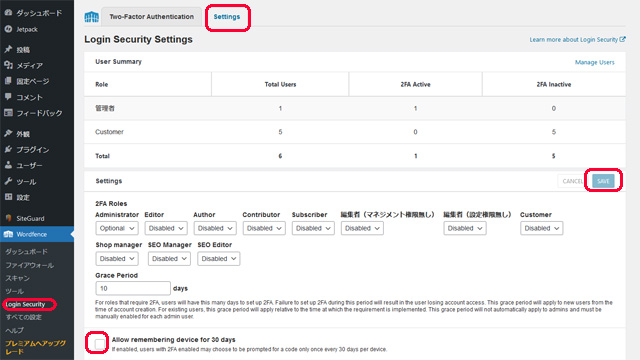
Login Security Settings(設定)
上部タブの[Setting]から詳細設定ができます。設定したあとは[SAVE]を押して確定してください。
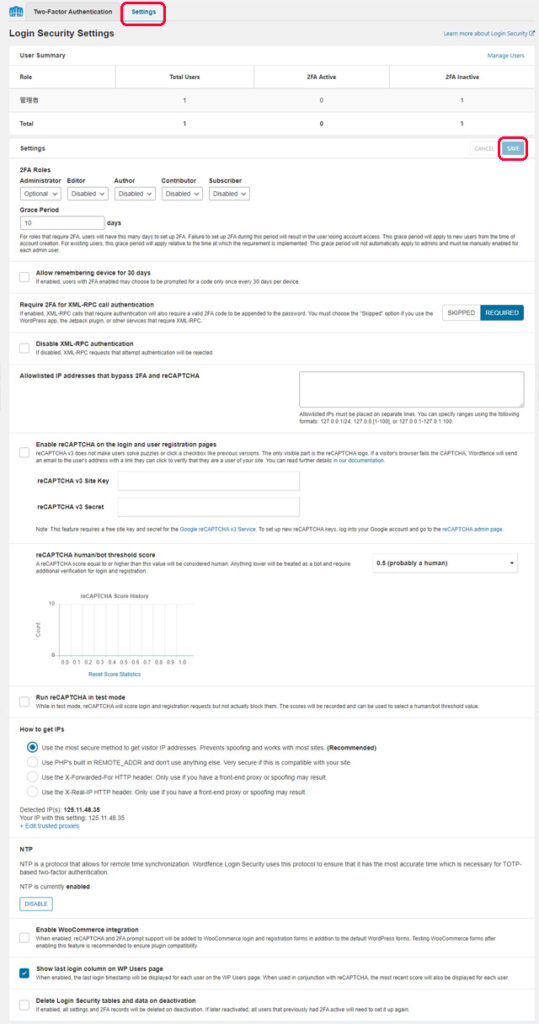
2FA Roles(2要素認証の役割)
デフォルトでは管理者のみが 2FA を利用できます。こちらから管理者以外のメンバーに 2FA を設定できます。
- Administrator:管理者
- Editor:編集者
- Author:著者
- Contributor:寄稿者
- Subscriber:加入者
役割の内容
- Required:必須 – この役割は、ログインするために 2FA を有効にする必要があります。ユーザーには、このオプションが有効になった日から、デフォルトで猶予期間が与えられます。
- Optional:オプション – この役割は 2FA を使用できますが、有効にする必要はありません。
- Disabled:無効 – この役割は 2FA を使用できません。管理者はこの選択肢を利用できません。
Grace Period(猶予期間)
For roles that require 2FA, users will have this many days to set up 2FA. Failure to set up 2FA during this period will result in the user losing account access. This grace period will apply to new users from the time of account creation. For existing users, this grace period will apply relative to the time at which the requirement is implemented. This grace period will not automatically apply to admins and must be manually enabled for each admin user.
訳)2FA を必要とする役割の場合、ユーザーは 2FA を設定するためにこの日数を持ちます。 この期間中に 2FA を設定しないと、ユーザーはアカウントにアクセスできなくなります。 この猶予期間は、アカウントの作成時から新しいユーザーに適用されます。 既存のユーザーの場合、この猶予期間は要件が実装された時点から適用されます。 この猶予期間は管理者に自動的には適用されず、管理者ユーザーごとに手動で有効にする必要があります。
Allow remembering device for 30 days(デバイスの記憶を 30日間許可する)
If enabled, users with 2FA enabled may choose to be prompted for a code only once every 30 days per device.
訳)有効にすると、2FA が有効になっているユーザーは、デバイスごとに 30 日に 1 回だけコードの入力を求めるように選択できます。
Require 2FA for XML-RPC call authentication(XML-RPC 呼び出し認証に 2FA を要求する)
If enabled, XML-RPC calls that require authentication will also require a valid 2FA code to be appended to the password. You must choose the “Skipped” option if you use the WordPress app, the Jetpack plugin, or other services that require XML-RPC.
訳)有効にすると、認証を必要とする XML-RPC 呼び出しでも、有効な 2FA コードをパスワードに追加する必要があります。 WordPress アプリ、Jetpack プラグイン、または XML-RPC を必要とするその他のサービスを使用する場合は、「スキップ」オプションを選択する必要があります。
- SKIPPED:スキップしました
- REQUIRED:必要
Disable XML-RPC authentication(XML-RPC 認証を無効にする)
If disabled, XML-RPC requests that attempt authentication will be rejected.
訳)無効にすると、認証を試みる XML-RPC リクエストは拒否されます。
Allowlisted IP addresses that bypass 2FA and reCAPTCHA(2FA と reCAPTCHA をバイパスするホワイトリストに登録された IP アドレス)
Allowlisted IPs must be placed on separate lines. You can specify ranges using the following formats: 127.0.0.1/24, 127.0.0.[1-100], or 127.0.0.1-127.0.1.100.
訳)ホワイトリストに登録された IP は、別の行に配置する必要があります。 次の形式を使用して範囲を指定できます: 127.0.0.1/24, 127.0.0.[1-100], or 127.0.0.1-127.0.1.100.
Enable reCAPTCHA on the login and user registration pages(ログインページとユーザー登録ページで reCAPTCHA を有効にする)
reCAPTCHA v3 does not make users solve puzzles or click a checkbox like previous versions. The only visible part is the reCAPTCHA logo. If a visitor’s browser fails the CAPTCHA, Wordfence will send an email to the user’s address with a link they can click to verify that they are a user of your site. You can read further details in our documentation.
訳)reCAPTCHA v3 では、以前のバージョンのようにパズルを解いたり、チェックボックスをクリックしたりする必要はありません。 目に見える部分は reCAPTCHA のロゴだけです。 訪問者のブラウザーが CAPTCHA に失敗した場合、Wordfence はユーザーのアドレスに、リンクをクリックしてサイトのユーザーであることを確認できる電子メールを送信します。 詳細については、ドキュメントを参照してください。
- reCAPTCHA v3 Site Key
- reCAPTCHA v3 Secret
Note: This feature requires a free site key and secret for the Google reCAPTCHA v3 Service. To set up new reCAPTCHA keys, log into your Google account and go to the reCAPTCHA admin page.
訳)注: この機能には、Google reCAPTCHA v3 サービスの無料のサイト キーとシークレットが必要です。 新しい reCAPTCHA キーを設定するには、Google アカウントにログインして reCAPTCHA 管理ページに移動します。
reCAPTCHA human/bot threshold score(人間/ボットのしきい値スコア)
A reCAPTCHA score equal to or higher than this value will be considered human. Anything lower will be treated as a bot and require additional verification for login and registration.
訳)この値以上の reCAPTCHA スコアは人間と見なされます。 これより低いものはボットとして扱われ、ログインと登録には追加の認証が必要になります。
Reset Score Statistics:スコア統計のリセット
Run reCAPTCHA in test mode(テストモードで reCAPTCHA を実行する)
While in test mode, reCAPTCHA will score login and registration requests but not actually block them. The scores will be recorded and can be used to select a human/bot threshold value.
訳)テストモードでは、reCAPTCHA はログインと登録のリクエストをスコアリングしますが、実際にはブロックしません。 スコアが記録され、人間/ボットのしきい値を選択するために使用できます。
How to get IPs(IP を取得する方法)
- Use the most secure method to get visitor IP addresses. Prevents spoofing and works with most sites. (Recommended)
- Use PHP’s built in REMOTE_ADDR and don’t use anything else. Very secure if this is compatible with your site.
- Use the X-Forwarded-For HTTP header. Only use if you have a front-end proxy or spoofing may result.
- Use the X-Real-IP HTTP header. Only use if you have a front-end proxy or spoofing may result.
- 訪問者の IP アドレスを取得するには、最も安全な方法を使用してください。 なりすましを防止し、ほとんどのサイトで動作します。 (おすすめされた)
- PHP の組み込み REMOTE_ADDR を使用し、それ以外は使用しないでください。 これがサイトと互換性がある場合、非常に安全です。
- X-Forwarded-For HTTP ヘッダーを使用します。 フロントエンド プロキシがある場合にのみ使用してください。そうしないと、スプーフィングが発生する可能性があります。
- X-Real-IP HTTP ヘッダーを使用します。 フロントエンド プロキシがある場合にのみ使用してください。そうしないと、スプーフィングが発生する可能性があります。
NTP
NTP is a protocol that allows for remote time synchronization. Wordfence Login Security uses this protocol to ensure that it has the most accurate time which is necessary for TOTP-based two-factor authentication.
訳)NTP は、リモート時刻同期を可能にするプロトコルです。 Wordfence ログイン セキュリティは、このプロトコルを使用して、TOTP ベースの 2 要素認証に必要な最も正確な時間を確保します。
NTP is currently enabled.:NTP は現在有効になっています。
Enable WooCommerce integration(WooCommerce 統合を有効にする)
When enabled, reCAPTCHA and 2FA prompt support will be added to WooCommerce login and registration forms in addition to the default WordPress forms. Testing WooCommerce forms after enabling this feature is recommended to ensure plugin compatibility.
訳)有効にすると、デフォルトの WordPress フォームに加えて、reCAPTCHA および 2FA プロンプトのサポートが WooCommerce のログインおよび登録フォームに追加されます。 プラグインの互換性を確保するために、この機能を有効にした後に WooCommerce フォームをテストすることをお勧めします。
Show last login column on WP Users page(WP ユーザーページに最終ログイン列を表示する)
When enabled, the last login timestamp will be displayed for each user on the WP Users page. When used in conjunction with reCAPTCHA, the most recent score will also be displayed for each user.
訳)有効にすると、WP ユーザー ページに各ユーザーの最終ログイン タイムスタンプが表示されます。 reCAPTCHAと併用すると、最新のスコアもユーザーごとに表示されます。
Delete Login Security tables and data on deactivation(非アクティブ化時にログイン セキュリティ テーブルとデータを削除する)
If enabled, all settings and 2FA records will be deleted on deactivation. If later reactivated, all users that previously had 2FA active will need to set it up again.
訳)有効にすると、非アクティブ化時にすべての設定と 2FA レコードが削除されます。 後で再アクティブ化した場合、以前に 2FA をアクティブにしていたすべてのユーザーは、2FA を再度セットアップする必要があります。
2段階認証
Wordfence Login Security は「あなたの知っていること(パスワード)」と「所有しているもの(スマートフォンなどの端末)」を利用した、2要素認証を利用します。
2要素認証にはワンタイムパスコードが必要です。
Google Authenticator や Microsoft Authenticator などの認証アプリケーションを使用して固有コードを生成してください。
筆者は Android の認証アプリ、Authy を使用しています。

WordPress ダッシュボード左メニューの[Wordfence]内[Login Security]を押します。
Two-Factor Authentication 画面が開くので、Android 端末の Authy アプリでQRコードを読み取ります。

二要素認証を有効にする方法
Android 端末の Authy アプリを起動して新しいエントリを登録します。
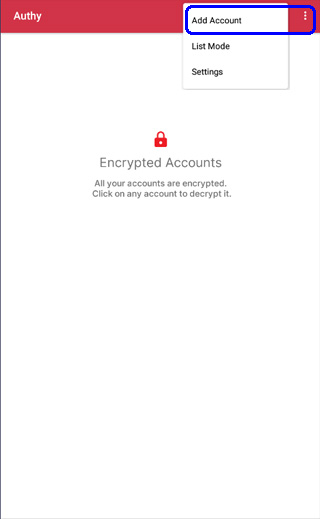
右上の[︙]押します。
メニューが開くので[Add Acount]を押します。
[Scan QR Code]を押して WordPress の「Wordfence Login Security」ページに表示されている QRコードを読み取ります。

Search logo by app に欲しいロゴのヒントを入力するとロゴを呼び出せます。
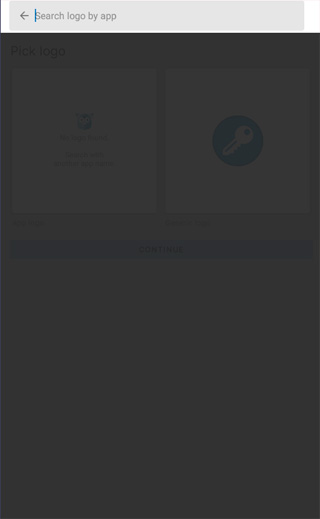
ロゴを選択したら[CONTINUE]を押します。

Account Nickname でアカウントに名前を付けます。
Enter Account Nickname の入力欄にわかりやすい名前を付けて[Save]を押します。

token が表示されます。
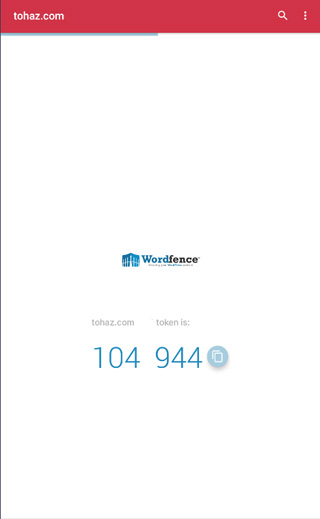
Authy で表示されたトークンを「Wordfence Login Security」ページに入力して[ACTIVATE]を押します。
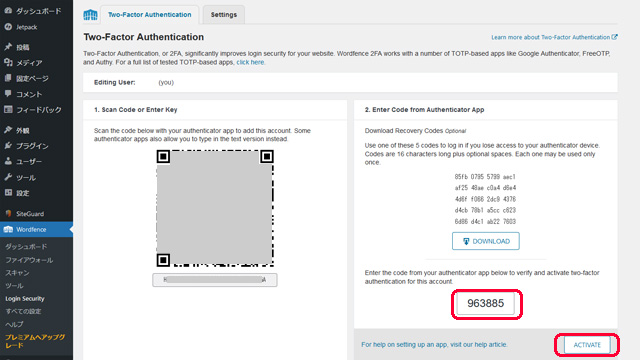
「Download Recovery Code」が表示されるので[ダウンロード]を押します。
デバイスを紛失した場合はリカバリーコードを使用できます。ファイルを印刷または保存して安全な場所に保管してください。
Reminder: If you lose access to your authenticator device, you can use recovery codes to log in. If you have not saved a copy of your recovery codes, we recommend downloading them now.
訳)注意: 認証デバイスにアクセスできなくなった場合は、回復コードを使用してログインできます。回復コードのコピーを保存していない場合は、今すぐダウンロードすることをお勧めします。

2要素認証が利用可能になりました。
- DEACTIVE:を押すと2要素認証を停止できます。
- GENERATE NEW CODE:を押すとリカバリーコードを作成できます。

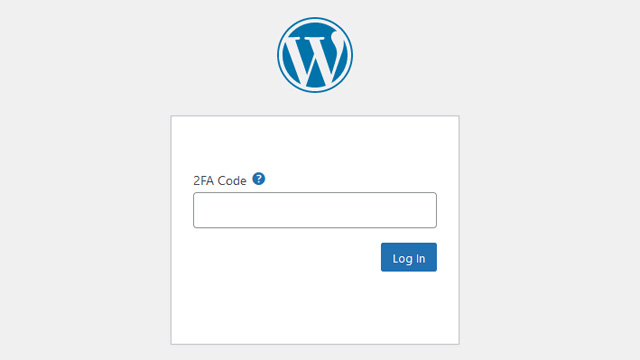
2要素認証のログイン方法
WordPess のログイン画面で[ユーザー名またはメールアドレス]と[パスワード]を入力して[ログイン]を押します。

2FA 入力画面が開くので端末の認証アプリケーションに表示されている 2FA CODE(ワンタイムパスコード)を入力して[Login]を押すと、2要素認証でログインできます。
毎回2要素認証がしんどい時の対処法
WordPress ダッシュボード左メニューの[Wordfence]内[Login Security]を押します。
上部の[Settings]タブを選択して「Allow remembering device for 30 days」に[チェック]をいれます。
設定を変更したら[SAVE]を押して確定してください。
有効にすると、2FA が有効になっているユーザーは、デバイスごとに 30日に 1回だけコードの入力を求めるように選択できます。
まとめ
Wordfence Login Security の設定方法でした。
Wordfence に統合されている Login Security ですが、Wordfence がサイト構成と相性が悪いとか重くて使いにくい場合には、 Login Security のみインストールして 2FA を利用してください。


コメント